I’ve had lots of experience with my Yanmar heat exchanger on my 387 and would bet a bunch you need to have it boiled (Make sure the radiator shop doesn’t “cold soak” it. It’s not the same.) I have had mine apart a few times and it isn’t a terrible job to get it cleaned and reassembled. A couple of points:
TIP: Before you remove it, use a straight edge along one row of tubes at the forward end of the heat exchanger and put reference marks on the housing so you can replace it easily. The exchanger will turn easily within the housing but it ultimately has a tab that fits a small hole on the rear cap. Unless you have removed the hoses (which I have found difficult), it is a real pain to get it lined up correctly going back in. If you look at the rear
You need to be logged in to see the rest of this content. Catalina380-IA members, please login.
To join please fill out a membership application (Association->Membership Application) and send a check to the address on the form.
I just flushed the system with Peak radiator flush and added new Prestone Premixed Dex-Cool antifreeze. It took about 1.25 gallons of premixed antifreeze. I plan to flush the system every 5 or 6 years and replace the antifreeze every 2 to 3.
Steps were as follows:
I removed the thermostat. It’s your choice on whether to do that. With it removed the engine won’t heat up much during the flush, but you won’t have to wait for it to reach operating temperature and open the thermo on each of these steps.
Drain the antifreeze from the system at the 2 drain fittings. The heat exchanger drain fitting is toward the back of the heat exchanger on the port side (there is a fresh water drain there too). The other antifreeze drain fitting is toward the middle of the engine block on the stbd side. I drained them into the
You need to be logged in to see the rest of this content. Catalina380-IA members, please login.
To join please fill out a membership application (Association->Membership Application) and send a check to the address on the form.
Jeff mentions “OATs” so I thought I would elaborate
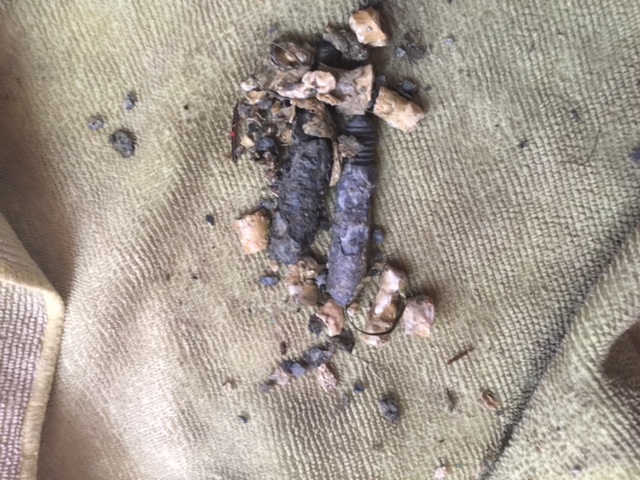
(The bolding and underlining are mine and may relate to the sludge some of us have found in our heat exchangers.)
“Automotive antifreeze/coolant is made of ethylene glycol, water, and a chemical additive package. For many years, there was only one type of antifreeze on the market, conventional green. Antifreeze technology has become significantly more complex in the last several years with the introduction of Dexcool and other extended life antifreeze formulas. Currently, there are three main types of antifreeze on the market. They all contain an ethylene glycol base, water, dye and an additive package. What makes them different is the additive package.
Conventional green antifreeze formulations usually contain a number of inorganic corrosion inhibitors that provide immediate corrosion protection because they maintain the pH of the solution (buffer it), but are consumed or transformed chemically as they perform their
You need to be logged in to see the rest of this content. Catalina380-IA members, please login.
To join please fill out a membership application (Association->Membership Application) and send a check to the address on the form.
2. Drain coolant from heat exchanger (drain under aft end of heat exchanger.
3. Loosen / remove hoses that will interfere with heat exchanger removal.
4. Remove bolts securing alternator & alternator brackets. Secure alternator forward and out of the way (should not need to remove wires). Be careful not to lose spacer holding alternator to engine block.
5. Remove bolts from caps securing heat exchanger core. Tap caps with rubber mallet to loosen and remove.
6. Score end of heat exchanger core to align same with heat exchanger body. Slide forward and remove.
7. Clean / service heat exchanger core (Rod out tubes, soak in radiator flush for 24 hours. Clean with brass wire brush. Be careful not to lose straight horizontal rubber/plastic gasket mounted on aft end of heat exchange core. [Editor note: Yanmar recommends replacement of the O-Rings and end
You need to be logged in to see the rest of this content. Catalina380-IA members, please login.
To join please fill out a membership application (Association->Membership Application) and send a check to the address on the form.
There has been some discussion on the Yahoo List regarding overheating due to fouling of the fresh water side (antifreeze side) of the heat exchanger. It turns out that this problem is not isolated to the C380/387. The May 2009 Mainsheet has an extensive article in the C470 section regarding a similar problem. It appears as a brown film, or sludge, on the freshwater side of the bundle. The source or origin is unknown. It had been proposed that this is a left over coating from the manufacturing process that is supposed to be cleaned during the commissioning process. However, I discussed that theory with Richard Mastry of Mastry Engines in St. Petersburg, who supplies engines to Catalina, and he was unaware of it. However, he did say that captains should be careful not to over-prop so the engines run at rated rpm’s, mix antifreeze to
You need to be logged in to see the rest of this content. Catalina380-IA members, please login.
To join please fill out a membership application (Association->Membership Application) and send a check to the address on the form.