Some early Catalina 380″s may have void areas between the hull and the back of the refrigerators present insulation. Voids area will be found on both side as well as the frontal areas. Additional foam must be added to the bottom area, some sort of temporary cofferdam will be required in this area. The following procedure will increase the “R” value of the refrigerator.
Please Take Note:
This procedure will require great care in the drilling and injecting of the foam. Caution will be required when drilling thru the refrigerator outboard face to the void area. Drilling too deep will contact the hull or hull liner. Use caution when injecting this foam. It can become very messy stuff. Clean with lacquer thinner or acetone immediately. All drilled hoes to be 1/4″ diameter.
Step 1. Remove range
Step 2. Remove sole and sub sole in the area of
You need to be logged in to see the rest of this content. Catalina380-IA members, please login.
To join please fill out a membership application (Association->Membership Application) and send a check to the address on the form.
Following is the second of two articles on this subject, this one by Richard Herbst, second owner of C380 #93, a late 1997 boat. The extra emphasis on the Freedom 800 is because of several serious relevant problems reported on our Sailnet email list and due to my desire to maximize your happy-hour time, at least for the captains of the 300 or so C380’s out there with this windlass. Other boats in the fleet have the VW800, either horizontally mounted [first approx 75 C380s] or, for late C380’s & C387s, vertically oriented.
Background & Repairs
I would like to amplify Warren’s article appearing in the previous issue regarding the Freedom 800 windlass. Warren was right on target when he advised owners to wash down that windlass frequently. A vertical main shaft only encourages water, salt,
You need to be logged in to see the rest of this content. Catalina380-IA members, please login.
To join please fill out a membership application (Association->Membership Application) and send a check to the address on the form.
Are you tired of that small pool of often dirty water that accumulates on the swim platform of your otherwise beautiful boat?? Well, help is at hand!!
I was surprised– almost shocked– to recently learn, via our Sailnet email discussion group, that many of our fleet do not have this simple, worthwhile device which eliminates water accumulations on the swim platform!!. How can this be?? It’s now taken at least two, maybe three happy hours for this info to sink into my brain and for me to do something about it! So you know that the value/$ of this upgrade must be high: at least semi-infinite!! In other words, this clearly worthwhile upgrade can be done for almost nothing!!
Picture, if you will, a brass tube, maybe 3/8″ diameter and 2″ long, flared at one end. What could be
You need to be logged in to see the rest of this content. Catalina380-IA members, please login.
To join please fill out a membership application (Association->Membership Application) and send a check to the address on the form.
For C387 captains with the baby-stay configuration [hulls #1-60+], a few of you have reported, on our Sailnet email discussion group, a bit of damage to the baby-stay tie points in the forward cabin. These have been- or are in process of- repair. Please note that various conditions can put excessive strain along the baby stay, just as they can on any stay or shroud.
I suggest checking the at-rest rig tensions, especially on both the baby stay and forestay; over tensioning the former and under tensioning the latter can be problematic. A “Loos” gauge or equivalent may help you get the best set-up. The forestay should be moderately tight; some riggers suggest the tension be set as tight as 10% of breaking strength, which is about 1000 lbs. If a back-stay tensioner is installed, know your stay
You need to be logged in to see the rest of this content. Catalina380-IA members, please login.
To join please fill out a membership application (Association->Membership Application) and send a check to the address on the form.
Although we are sailors at heart, and hopefully by practice, we do need to call on our auxiliary engines regularly. With some luck, it’s only off and on the dock, or in and out of the harbor, but sometimes our “iron genny” will be cranking away for hours at a time. Whatever the modes of operation, there sometimes appears a cloud of doubt: will she start ok?…or how long can the engine keep going like this?
To bring the sunshine–and dispel any clouds–there are at least two general approaches, [maybe three if you include Happy Hours]: maintenance and testing. Most of us are patently familiar with the former: change oil regularly [about 100 hours], keep cooling system in good shape [strainer, impeller, heat exchanger on the raw water side, antifreeze/rust inhibitor for the fresh water system [use the fairly
You need to be logged in to see the rest of this content. Catalina380-IA members, please login.
To join please fill out a membership application (Association->Membership Application) and send a check to the address on the form.
Waste System Mods
Mike Kenny/Bob Goldman/Steve Krazinski November, 2007
Hull #: C380 # 77/243/102
Following are probably the best methods towards eliminating unpleasant head odors from our C380-390’s. [Note that C387’s have a completely different waste system, one that uses only the new “odor-safe” hose, so most of the following does not apply.]
The basic approach here is to eliminate the older black hose and install rigid PVC piping wherever waste is continually present and doing so is practical. PVC is considered non-permeable so, properly installed, there should be zero odor from it. Alternatively, where not practical, installation of the relatively new “odor-safe” or “noodor” hose is the approach of choice. With regard to the tank egress plumbing, the only part which is continually in contact with waste is the main tank-output line, so this is the primary candidate for upgrading to PVC. Replacing other hoses with PVC or with
You need to be logged in to see the rest of this content. Catalina380-IA members, please login.
To join please fill out a membership application (Association->Membership Application) and send a check to the address on the form.
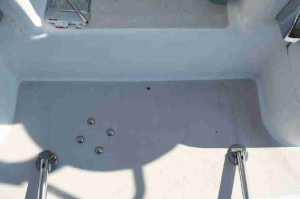
1- Decide on approx placement of drain tube. Note from photo that location depends on how/where autopilot is installed. For those with no autopilot, locate drain tube in center [port/stb] and as close to vertical step as possible [but be aware of size of your electric drill]. Mine is about 7/8″ aft of “riser”.
2- Autopilot drive mechanism is usually installed offset, so you will want to have drain tube on opposite side in order to be as close to center as possible
3- Release wheel [so that rudder is easy to turn from below], and climb down into lazarette on the side opposite autopilot. Look over area, noting existing cockpit drain hose[s], and where you’ll cut into one and insert T for platform drain. Note also how autopilot mechanism moves laterally as rudder is turned. Find
You need to be logged in to see the rest of this content. Catalina380-IA members, please login.
To join please fill out a membership application (Association->Membership Application) and send a check to the address on the form.
SSB Radio Installation Steve Dublin August, 2007 Hull #: C380 #84
Editor’s Introduction– As I spent many of my younger years as an active radio amateur [ham] and virtually all of my work life in antenna & microwave engineering, I feel some degree of justification for the comments you’ll see sprinkled throughout the article below [apologies to author: Steve Dublin]; I hope they’re helpful– that’s the intent!
One general comment by way of clarifying some terms. The two popular versions of transceivers used by sailors are “Marine” and “Ham” types; they are both capable of SSB transmissions. Their functional distinction is principally that of frequency of operation. Marine SSB units are limited to certain frequencies as dictated by the FCC.
Ham units were limited to other frequencies, called Ham bands, but newer Ham transceivers are capable of operation on both marine and Ham frequencies, so there’s a distinct advantage for
You need to be logged in to see the rest of this content. Catalina380-IA members, please login.
To join please fill out a membership application (Association->Membership Application) and send a check to the address on the form.
Portlights- Resealing & Reinstalling Rick Ranno May, 2007 Hull #: C-380 # 297
After a few years with my C380 [#297], the portlights developed some water leaks. Most were not obvious as to cause. So, after deciding to “dig in”, the first thing I did was to determine that the portlight was leaking and that a dirty or bad window gasket was not the cause. To do this, I removed the plastic trim rings with a screwdriver and applied some powder around the suspected areas. After several days including some rain, drip lines in the powder made it obvious that most leaks were entering via the window-tohull seal or, in this case, lack of seal. The best, long-term way to beat this one is complete portlight removal and re-installation.
First, with the trim ring removed, remove the 10/32 Philips mounting screws. Use a heat gun to help loosen the seal
You need to be logged in to see the rest of this content. Catalina380-IA members, please login.
To join please fill out a membership application (Association->Membership Application) and send a check to the address on the form.
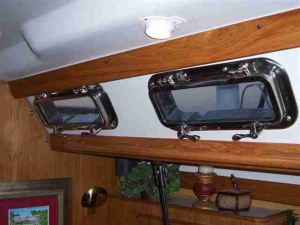
Port light Replacement Don and Linda Rooker May, 2007 Hull #: C380 #157
Don and Linda Rooker, who sail “Jolly Mon”, in the Pickwick Lake/ Tennessee River region of North East Mississippi, felt that the crazing on their original portlghts was too much and decided to go for stainless-steel framed units. So, thought I’d insert their photo here, as a different approach [See Photo]. As their new portlights, made by New Found Metal [.com], have tempered glass, no more crazing. Most of the fleet, including Admiral Jeanne and I, continue to shy away from glass on board. Perhaps a few have wine glasses carefully stowed?? But tempered glass is pretty strong.
You need to be logged in to see the rest of this content. Catalina380-IA members, please login.
To join please fill out a membership application (Association->Membership Application) and send a check to the address on the form.