Category Archives: Port Lights

How To Identify Your Lewmar Portlight

Warren,

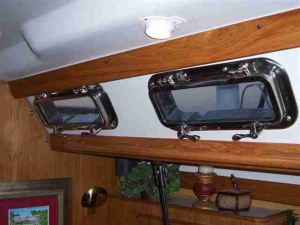
When switching the discussion to highlight concurrent changes in portlights, we may be adding an element of confusion. The Old/New portlights don’t fall under the coast/ocean model designation, Lewmar simply designates them as either Old or New Standard portlights. It doesn’t appear that there ever was an “Old coast version”. To add to the confusion there actually was an old Ocean version portlight, that like the old standard portlight has a twist lever. Since Makana Kai has the Lewmar New Standard Portlights, I’m clueless as to whether Catalina equipped older boats with the old standard portlights or Ocean Portlights

That or Bomar’s! [Following link goes to:  How To Identify Your Lewmar Portlight ]

https://www.lewmar.com/node/14691

PS…We’re just happy that our Coastline hatch isn’t leaking any more, as it’s currently raining!

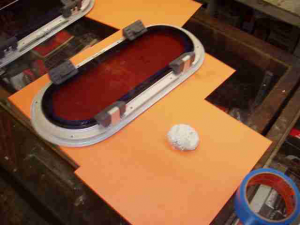
One of my doc mates walked by as I was applying Sikaflex to the hatch frame in preparation for bedding,

You need to be logged in to see the rest of this content.  Catalina380-IA members, please login.

To join please fill out a membership application (Association->Membership Application) and send a check to the address on the form.

Forward Hatch Replacement

Just received the following information from Lewmar to my question about parts and what currently produced hatch is a direct replacement for my Coastline Trapezoid 65.

Please see the link for the spares for the coastline hatch.
http://www.lewmar.com

replacement hatch 39965030 low profile http://www.lewmar.com

regards Lewmar Team

Looks just like the Coastline hatch to me.

Jim Turner
“Makana Kai”, 2000 C380, #227


Well the hatch is bedded and curing. Learned a few more things about Makana Kai’s Lewmar hatches. Their identified on the lens as the Coastline series not Ocean. The trapezoid one in the V-berth is a 65, the large one in the salon a 40, and the smaller ones 10’s. Richard Stanton and I realized that Hunkydory (C380 #241), docked three slips away, has different hatches, likely Ocean series.

After finding that Lewmar is slow to answer inquiries, and doesn’t stock many parts, I ordered seals from

You need to be logged in to see the rest of this content.  Catalina380-IA members, please login.

To join please fill out a membership application (Association->Membership Application) and send a check to the address on the form.

Rebedding of Dead Lights

For those (like me) who didn’t know the term “dead light”, those are the pure plexiglass windows on the sides of our cabins, i.e. not the “port lights” which are the oval ports with aluminum frames…

I asked for advice on rebedding these to eliminate a persistent leak.  The following is the information provided:


Tom,

I purchased the 2 port side deadlights from Catalina. They suggested Dow Corning 795 in Black. Their price was over $20 per tube, I bought it at a supply house in Catonsville for under $15. I had an automotive glasser do mine, I wouldn’t recommend them. When you do them you can get some wood slats to wedge between the sheet tracks and the hand rail and put sponges under the slats to hold the deadlight tightly while curing. Blue painters tape also.

Good luck,

Skip
C.S.Wilkins


Assuming that you referring to one of the

You need to be logged in to see the rest of this content.  Catalina380-IA members, please login.

To join please fill out a membership application (Association->Membership Application) and send a check to the address on the form.

Sealing Leaks in Lewmar “Old Standard” Portlights

By: Tim Porter, C-380 #199 “Serendipity”
Mainsheet – August 2010

If you have an older Catalina, your Lewmar portlights are likely what are known as the “Old Standard” portlight. (note: these are NOT the overhead hatches, which are “Ocean” series hatches) These portlights can be identified by the split in the upper and lower frames on each side. If you have these portlights, you have probably been battling hard-to-find leaks. [My 1999 vintage C380, #194 still has the “Old Standard” ports. – Steve]

Most of these leaks are not from the seal or the latches, but rather from those splits in the frame I noted above. The frame itself is a hollow extrusion and the two halves are joined with a plastic insert that is pressed into them which is then staked into place by dimpling the backside of the frame. Over time, the sun and age takes its toll

You need to be logged in to see the rest of this content.  Catalina380-IA members, please login.

To join please fill out a membership application (Association->Membership Application) and send a check to the address on the form.

Portlights- Resealing & Reinstalling

Portlights- Resealing & Reinstalling
Rick Ranno
May, 2007
Hull #: C-380 # 297

After a few years with my C380 [#297], the portlights developed some water leaks. Most were not obvious as to cause. So, after deciding to “dig in”, the first thing I did was to determine that the portlight was leaking and that a dirty or bad window gasket was not the cause. To do this, I removed the plastic trim rings with a screwdriver and applied some powder around the suspected areas. After several days including some rain, drip lines in the powder made it obvious that most leaks were entering via the window-tohull seal or, in this case, lack of seal. The best, long-term way to beat this one is complete portlight removal and re-installation.

First, with the trim ring removed, remove the 10/32 Philips mounting screws. Use a heat gun to help loosen the seal

You need to be logged in to see the rest of this content.  Catalina380-IA members, please login.

To join please fill out a membership application (Association->Membership Application) and send a check to the address on the form.

Portlight Replacement

Port light Replacement
Don and Linda Rooker
May, 2007
Hull #: C380 #157

Don and Linda Rooker, who sail “Jolly Mon”, in the Pickwick Lake/ Tennessee River region of North East Mississippi, felt that the crazing on their original portlghts was too much and decided to go for stainless-steel framed units. So, thought I’d insert their photo here, as a different approach [See Photo]. As their new portlights, made by New Found Metal [.com], have tempered glass, no more crazing. Most of the fleet, including Admiral Jeanne and I, continue to shy away from glass on board. Perhaps a few have wine glasses carefully stowed?? But tempered glass is pretty strong.

You need to be logged in to see the rest of this content.  Catalina380-IA members, please login.

To join please fill out a membership application (Association->Membership Application) and send a check to the address on the form.

More on Portlight Leaks

More on Portlight Leaks
Richard Herbst
August, 2007
Hull #: C380 #93

Last month’s [May 07] article on repairing portlight leaks omitted one source of a leak that is very easy to fix. On my boat (C380, S/N 93), the 2-horizontal seams in the Lewmar portlight’s frame is a primary source of leakage and the fix is really simple. My boat had been in the Gulf area for many years with the result that sunlight beat these seams to death. To fix, just run a bead of sealant across each seam and the leak stops (see photo).

Note that the portlight frame is hollow, so after sealing the seams, you may have to take a brisk sail to heel and spill the residual water out of the already present holes in the lower part of the frame. Before starting, put a towel there to catch the water.[Suggest removing trim ring;

You need to be logged in to see the rest of this content.  Catalina380-IA members, please login.

To join please fill out a membership application (Association->Membership Application) and send a check to the address on the form.

Improved Ties For Portlight Curtains

Improved Ties For Portlight Curtains
Bob Bierly

August, 2006 Hull #: 255

Many of you have probably experienced the wearing out of those dainty little strips of velcro provided by Mother Catalina to hold the accordion / pleated curtains for the opening and fixed ports. Not only have mine died, but I never did like them anyway as two hands were generally insufficient to fold up the shade and pull down on two or more velcro tabs. [Note: your editor also finds them a bit of a pain: to reset any shade it’s difficult to retrieve the underneath tab- Warren]

So, here’s a simple, cheap and effective fix requiring little work, not much material and even less talent. For each port you need ten inches of flat elastic material about 1/2 inch wide. Cut the elastic into two 5- inch pieces. Form a loop by overlapping each 5 inch

You need to be logged in to see the rest of this content.  Catalina380-IA members, please login.

To join please fill out a membership application (Association->Membership Application) and send a check to the address on the form.

Installing Portlight Screens

Installing Portlight Screens
Warren Elliott
Mainsheet Date: 2/1/2005
Hull #: 44

The diagrams below show the method for installing the screens for the portlights on hulls somewhere around C380 hull #200. The screens are probably the same for all 387’s and 390’s.

Note that the shape of the portlights on the drawing look remarkably like the ones used on hulls less than 200. I suspect that Lewmar used whatever sketches were handy and adapted them. Bottom line is that the newer portlights should appear much more rounded at the ends, hence oval [you can see the true shape on their website]. Distinguishing features shown are “push-type” window latches [a bit difficult to tell, unless you’ve seen them first hand] and the bar or strap across the top of the screens [oval shape should have also been a distinguishing feature].

These drawings show the process that should be used when installing

You need to be logged in to see the rest of this content.  Catalina380-IA members, please login.

To join please fill out a membership application (Association->Membership Application) and send a check to the address on the form.

Hatches – Screen Hinges

Hatches –  Screen Hinges
Warren Elliott
11/27/2004

Hull #: 44

We all want to make/keep all things simple, right? Well, definitely fitting this category are the relatively new screen hinges by Lewmar, manufacturer of our overhead hatches.

Admiral Jeanne and I always found it bothersome to remove, store and/or install the hatch screens. It was particularly irksome when a sudden rain shower required quick screen removal so that the hatch[es] could be closed. Also, when not in use they require storage space, which is particularly problematic for the very large forward unit.

The answer is to store the screens in-place while having a quick/easy opening and closing setup. Lewmar’s screen hinges fit the bill. The photo [see photo 1] shows our C380’s large hatch in the main cabin, with the screen open. [The view is towards the port quarter]. It’s held in place by a pair of the special hinges.

You need to be logged in to see the rest of this content.  Catalina380-IA members, please login.

To join please fill out a membership application (Association->Membership Application) and send a check to the address on the form.